If you are a new seller on Amazon or you just haven’t spent much time exploring Seller Central, you might be overwhelmed by all there is to know and do within the system. While there are seemingly endless possibilities and resources within Seller Central, this list of 10 things to know how to do is a great place to start. From the basics to the more complex, these tips will help you to manage your business with Amazon with greater ease and finesse.
1. How to Navigate Seller Support
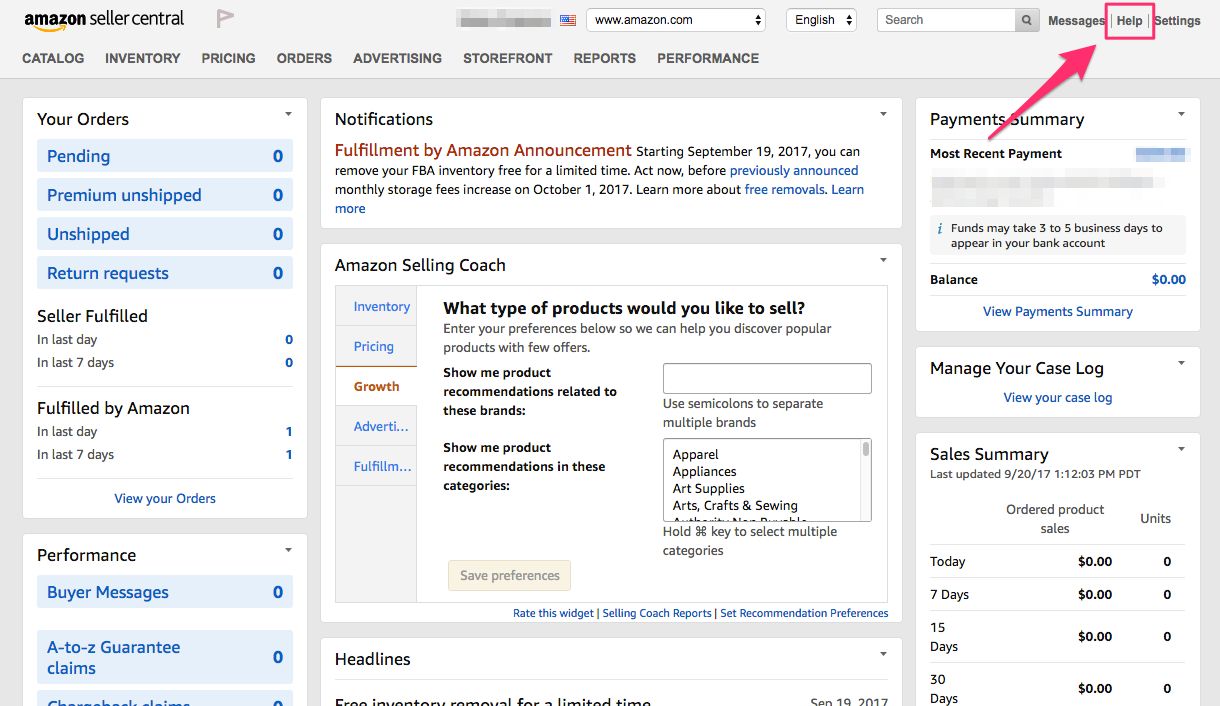
When you run into a question or problem while selling your products on Amazon, you have multiple options for how to get help. The first place to check is the Seller Central Help Center. There are countless helpful articles about common issues or questions that are available at your fingertips simply by searching in the search bar. This is the fastest way to get answers to your questions, and doesn’t require contacting support to submit a case.
Locating the Seller Central Help Center
Use the Search Bar to Find Answers to Your Question

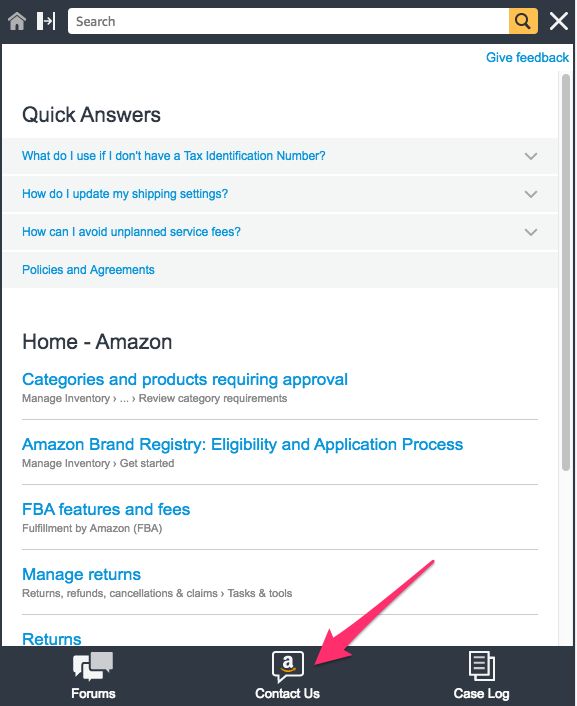
If your issue can’t be answered in the help archives, then you will need to contact Seller Support by clicking the “Contact Us” option at the bottom of the help page.
From here you can select the issue type that best fits your question and submit your case. In most situations you can choose between speaking on the phone with an Amazon associate or being contacted via email with a response to your issue. In some instances you will also have the option for a live chat.
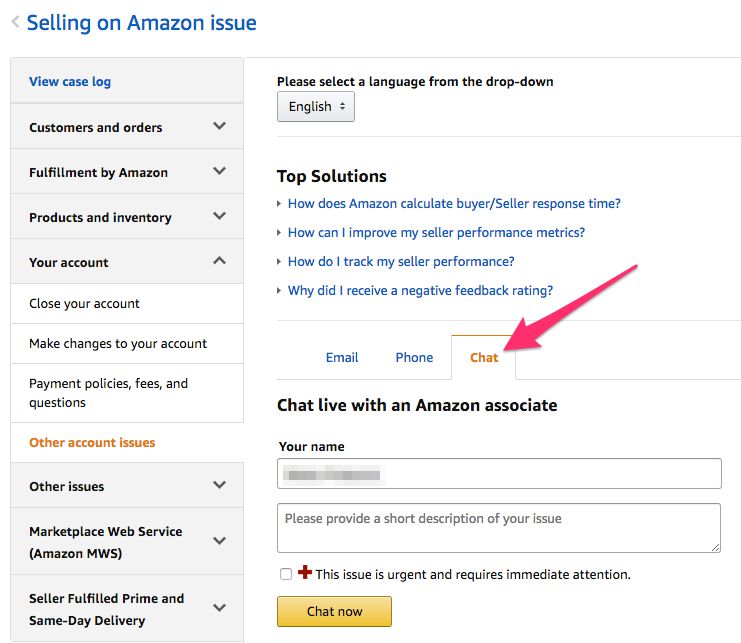
However you decide to submit your question, be sure to include a complete and descriptive explanation of your issue along with all pertinent details (ASINs, order IDs, etc.). This attention to detail will go a long way in increasing the odds of getting your question successfully answered.
2. How to Update Account Information
Maybe you’ve opened a new business banking account, or have a new business credit card you’d like to associate with your Seller Central Account. Or perhaps you need to update your business address or tax information, or you just want to change your Seller Central password. Whatever the circumstance, it is important to know where to go to update the information for your account. Thankfully Amazon makes it pretty easy.
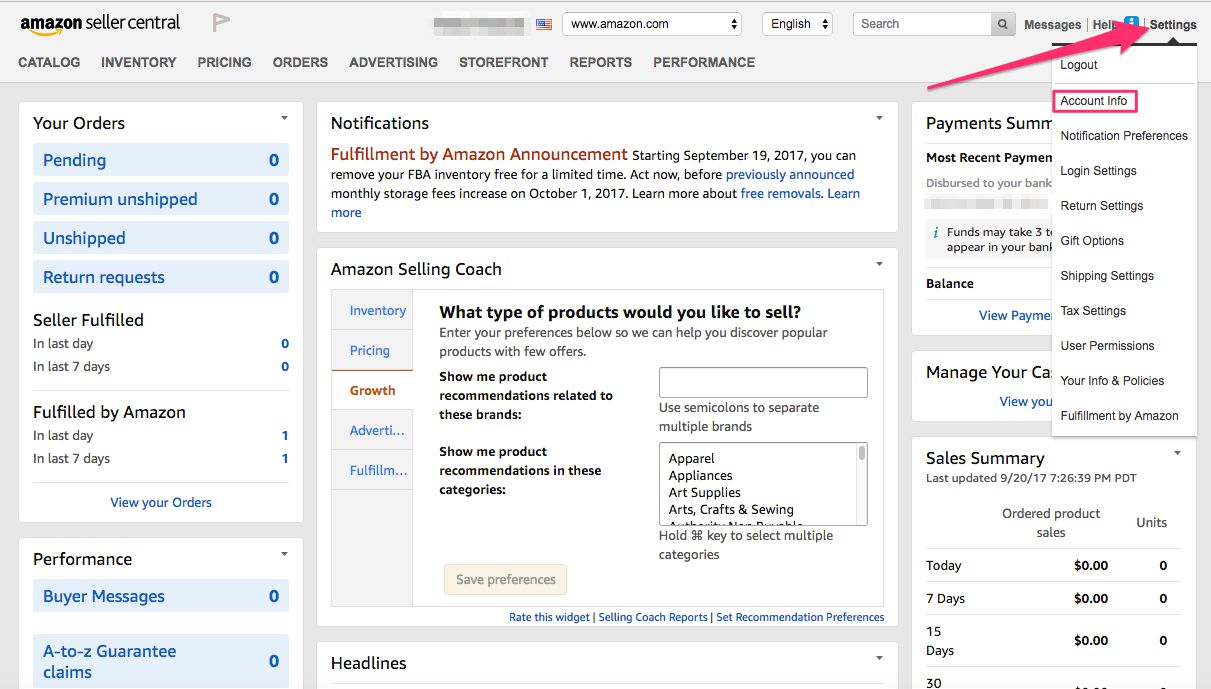
If you click on the Settings drop-down in the upper right hand corner of the home page screen, you’ll see a menu of options for updating various types of information for your account. For most account updates, you’ll want to click on Account Info.
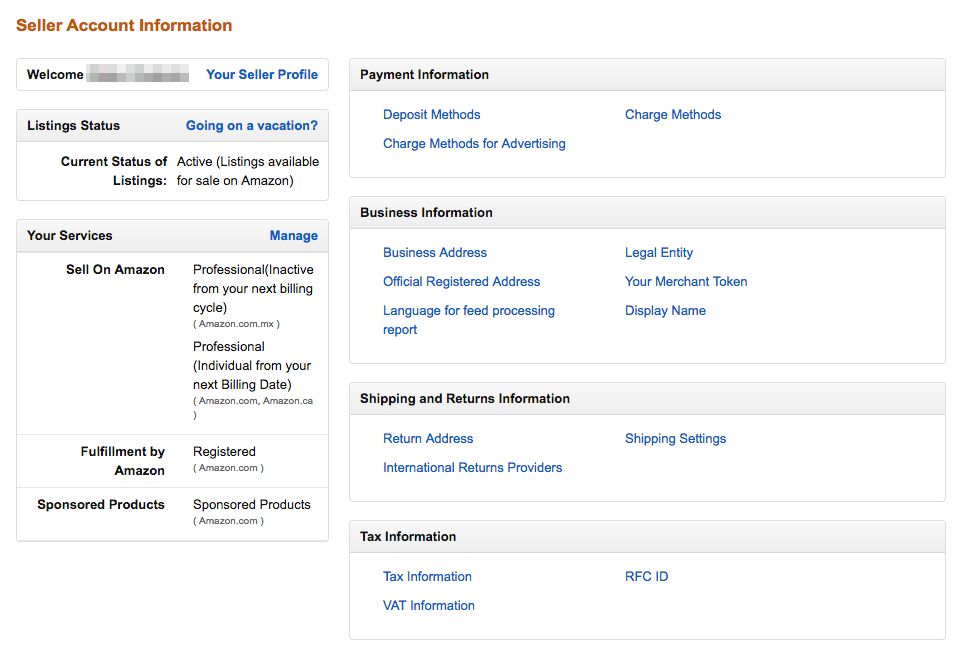
From this screen you can click into any piece of information you need to update and make the necessary changes.
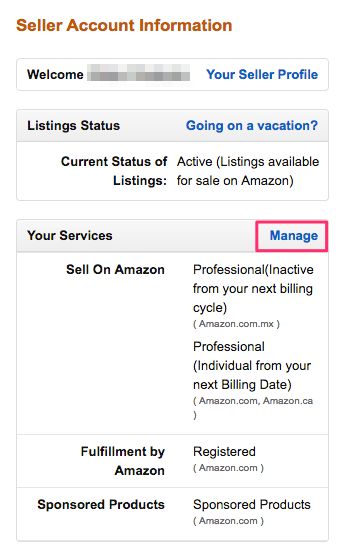
You can also click Manage under the Your Services section to make changes to your account plan, FBA registration, or other services.
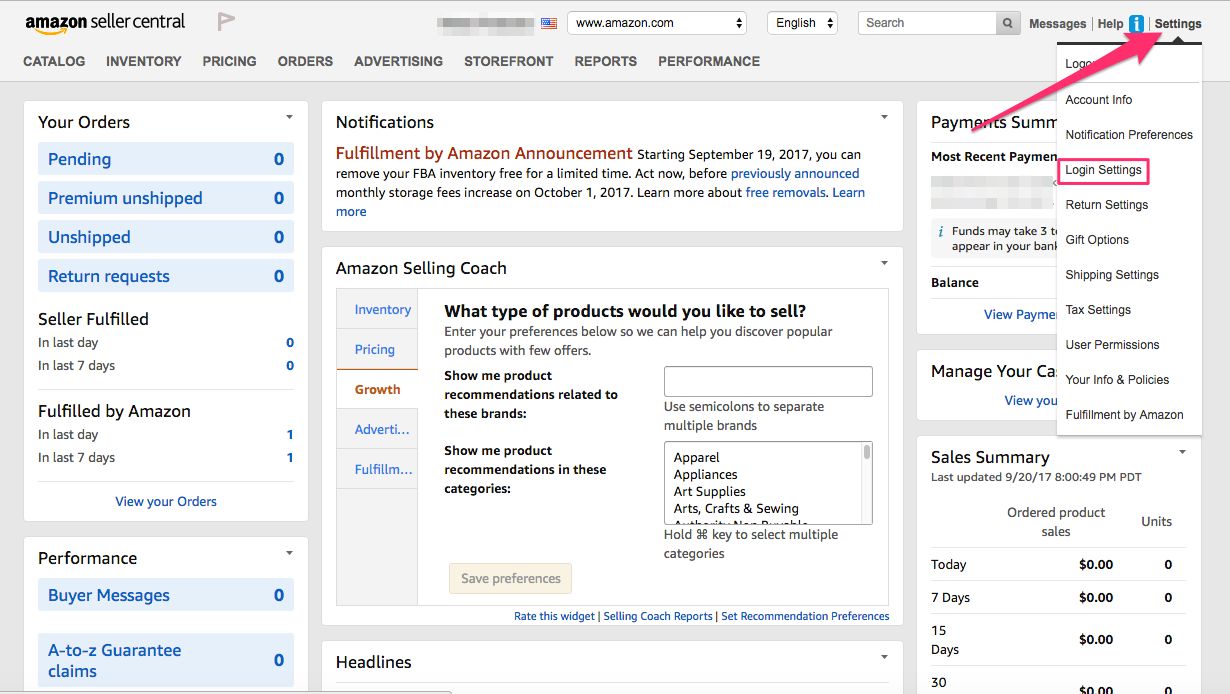
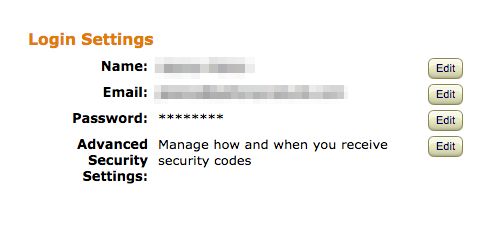
To update your login settings and change your password or the email address associated with your account, click on Settings and select Login Settings to make the necessary changes.
Learn more at:
Update your account information (Seller Central login required)
3. How to Give Employees Access to Your Account
As your business grows you will probably want to delegate many day to day tasks to other employees within your business. Within Seller Central you can create invitations to send to your employees to grant them access to your account, and you can also set the exact account permissions that you want to give each user.
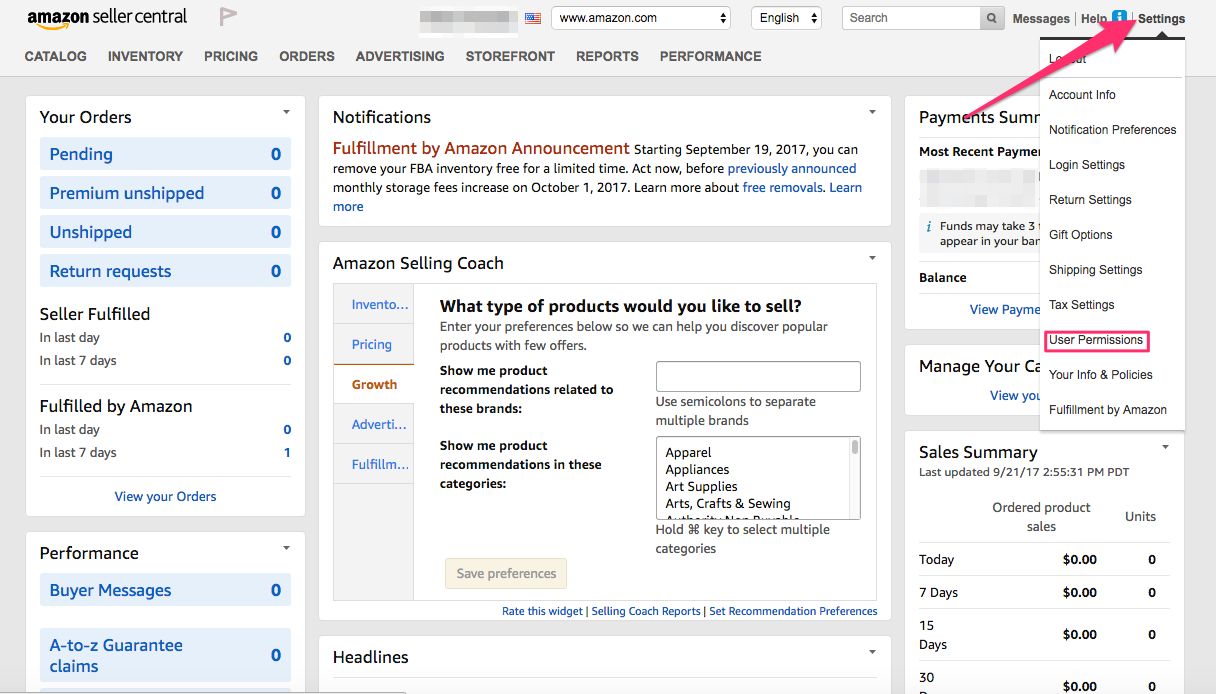
To invite a user to your Seller Central account, select User Permissions from the Settings drop-down in the upper right corner of the Seller Central homepage.
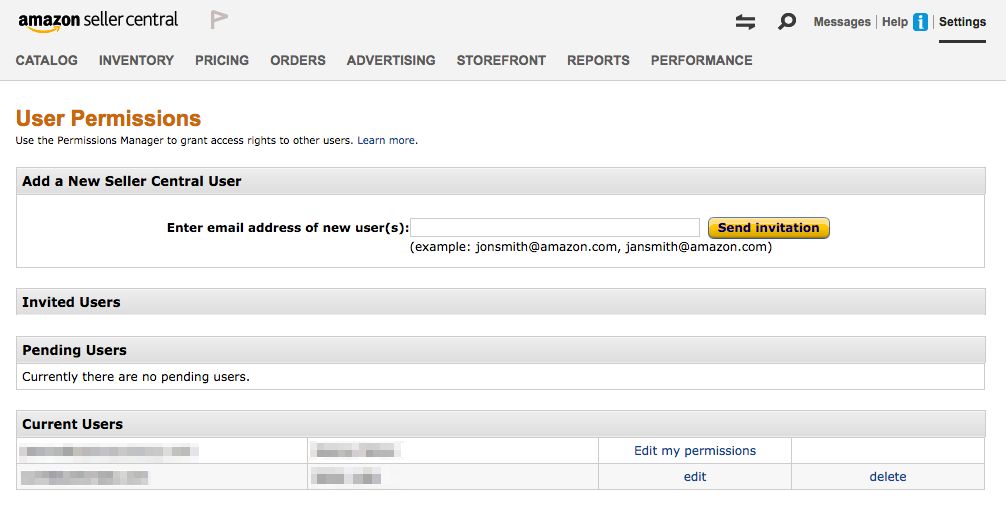
From here you’ll be taken to the page where you can enter the email address for the user you wish to invite, as well as edit the permissions of a user.
Learn more at:
Set user permissions (Seller Central login required)
4. How to Generate Payment and Tax Reports
Generating payment and tax reports from Seller Central is one of those things that you’ll need to do on a regular basis, so it is a good idea to be well-versed on the process.
Payment Reports
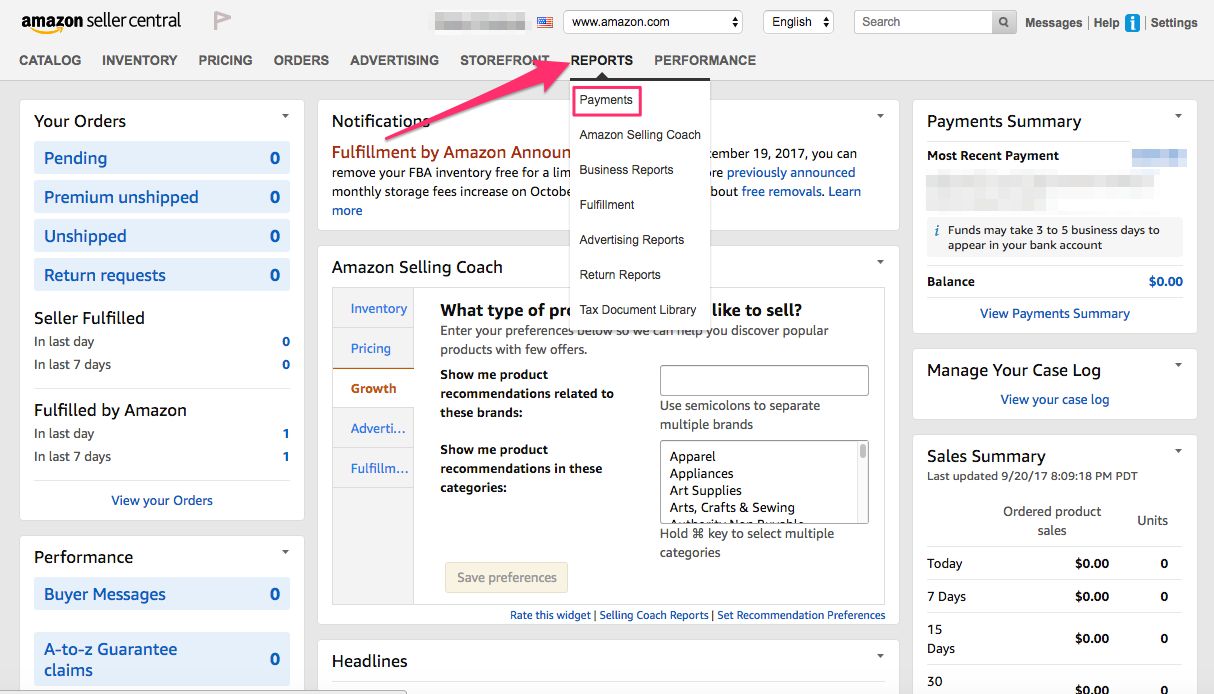
You’ll start by selecting Payments from the Reports drop-down on the Seller Central homepage.
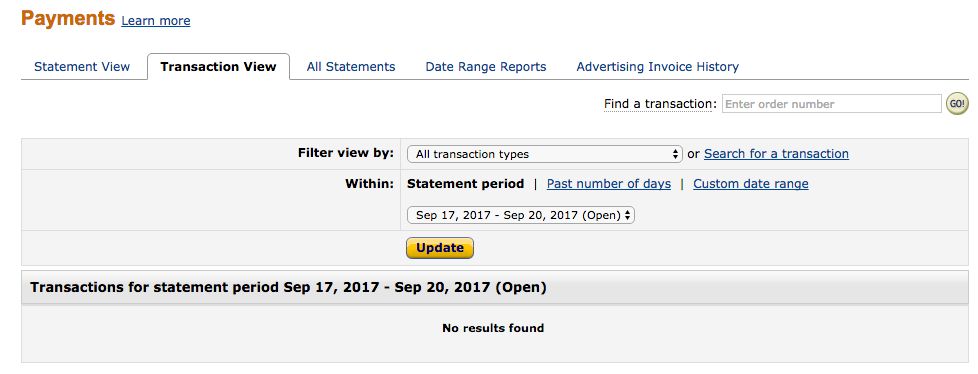
From here you will be taken to a screen where you can view your payments information as statements, transaction level reports, or date range reports. You can also generate reports specific to advertising payments that you have made for Sponsored Product campaigns.

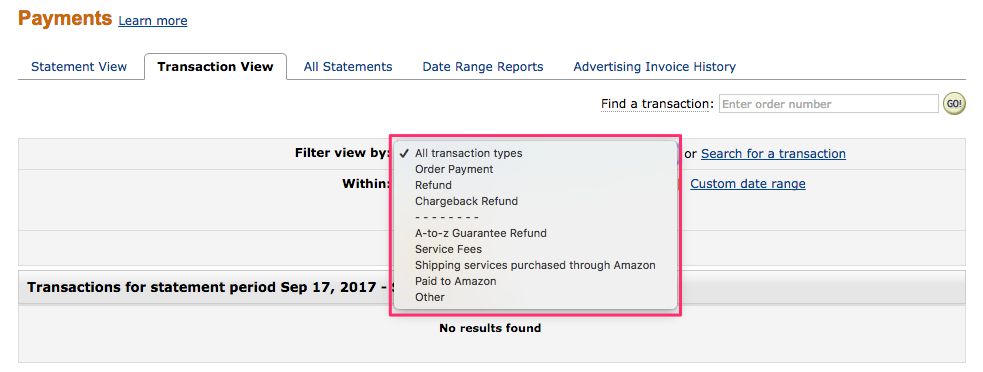
When looking at transaction view reporting you have the option to search by various dates such as a certain statement date, a specific date range, or payments made within the last certain number of days. You can also search by Order ID, or filter the view by transaction types to identify payments from returns, chargebacks, service fees, or other types of payments.
Tax Reports
If you are a Professional Seller who has configured the Tax Calculation Service you will have access to a Sales Tax Report. To access this report, select Tax Document Library from the Reports drop-down on the Seller Central homepage.

Under Sales Tax Reports click Generate a tax report, and select the date range you wish to see for your report. You can select a specific month or a custom date range. Click Generate to run the report. [a]

Learn more at:
Payments reports (Seller Central login required)
Download payment reports (Seller Central login required)
How do I read my payments report? (Seller Central login required)
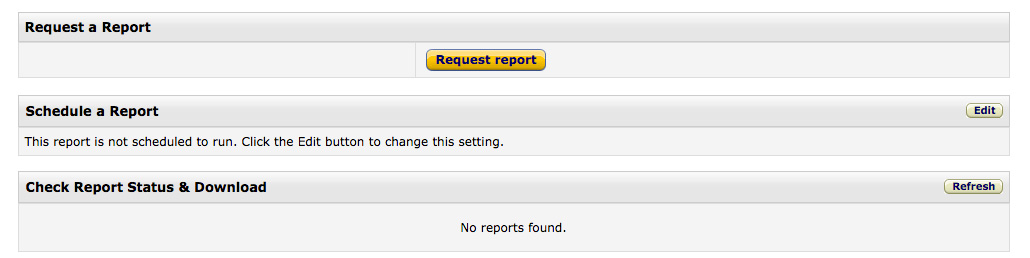
5. How to Download Advertising Reports
If you are running an advertising campaign through Sponsored Products, you’ll periodically want to review the results of your campaign to make changes or adjust your approach.
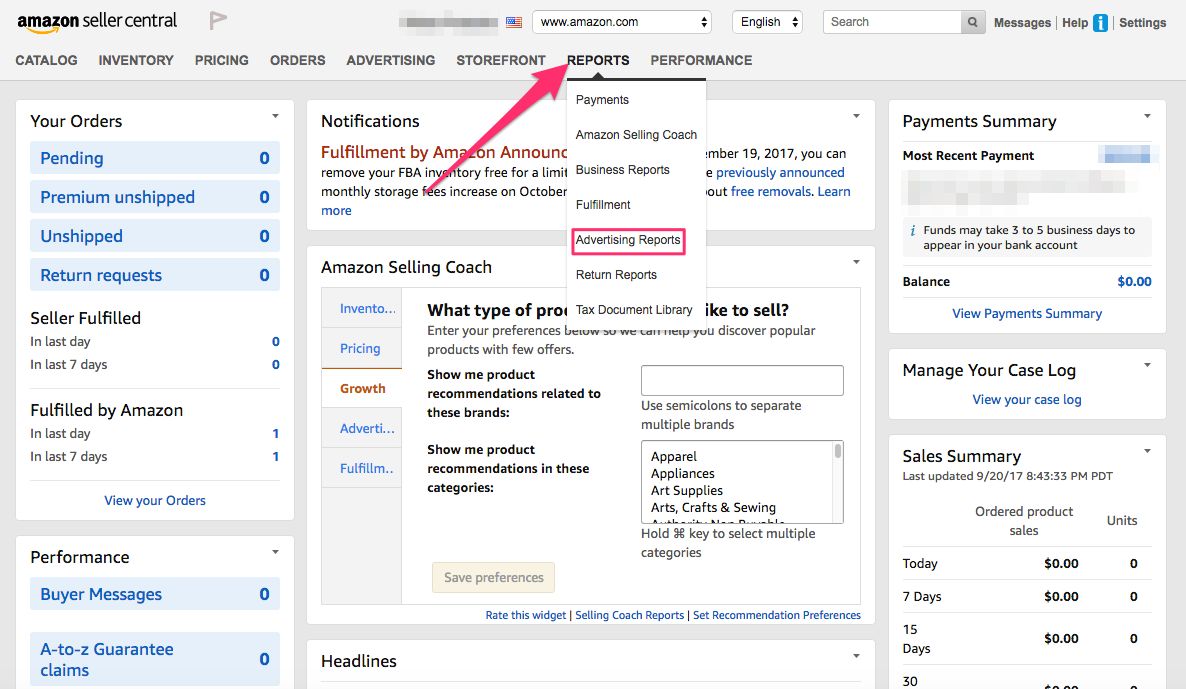
To access the advertising reports, begin by selecting Advertising Reports from the Reports drop-down on the Seller Central homepage.
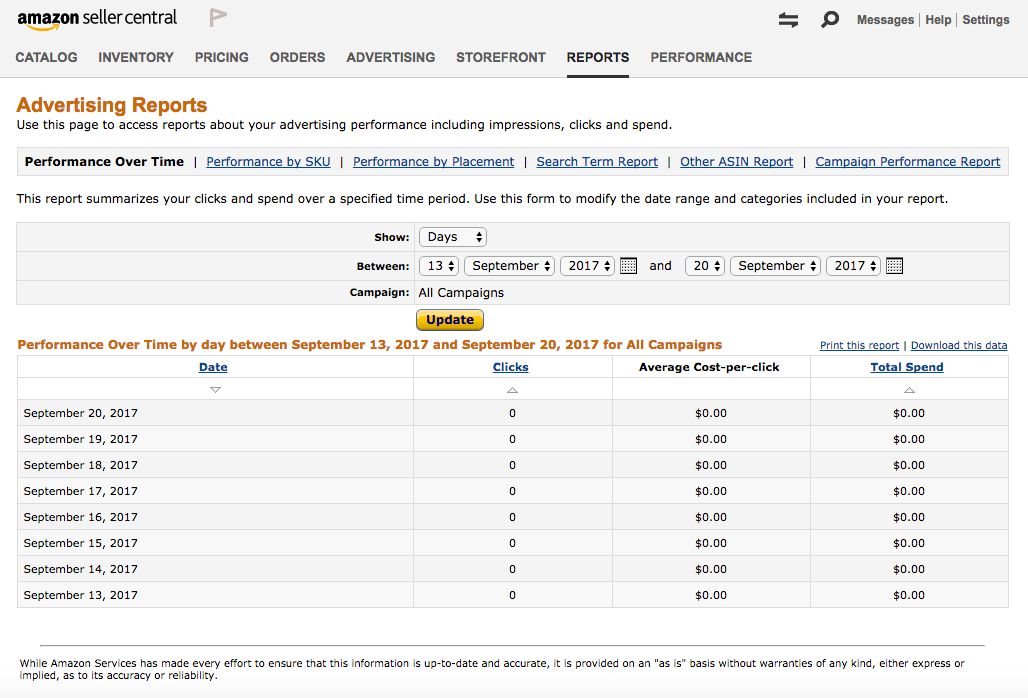
Within Advertising Reports you will find a wide range of options for how to view your advertising results, such as viewing performance over time or the performance of a specific SKU or placement. You can also pull a search term report to identify which search terms are the highest performing for your advertising campaigns, allowing you to modify the keywords or bids on your campaigns to make them more effective. The Other ASIN report is a helpful tool that shows you the other ASINs purchased after a customer clicks on one of your ads.
At the bottom of each report type you can request a single report or you can schedule the report to run at regular intervals.
6. How to Monitor Feedback
Customer feedback is vitally important to the health of every seller offering products on Amazon. While the type of feedback you receive as a seller is up to the discretion of the customer providing the feedback, by closely monitoring the feedback you receive you can work directly to manage any negative feedback and respond in whatever manner is most appropriate.
Feedback Reports
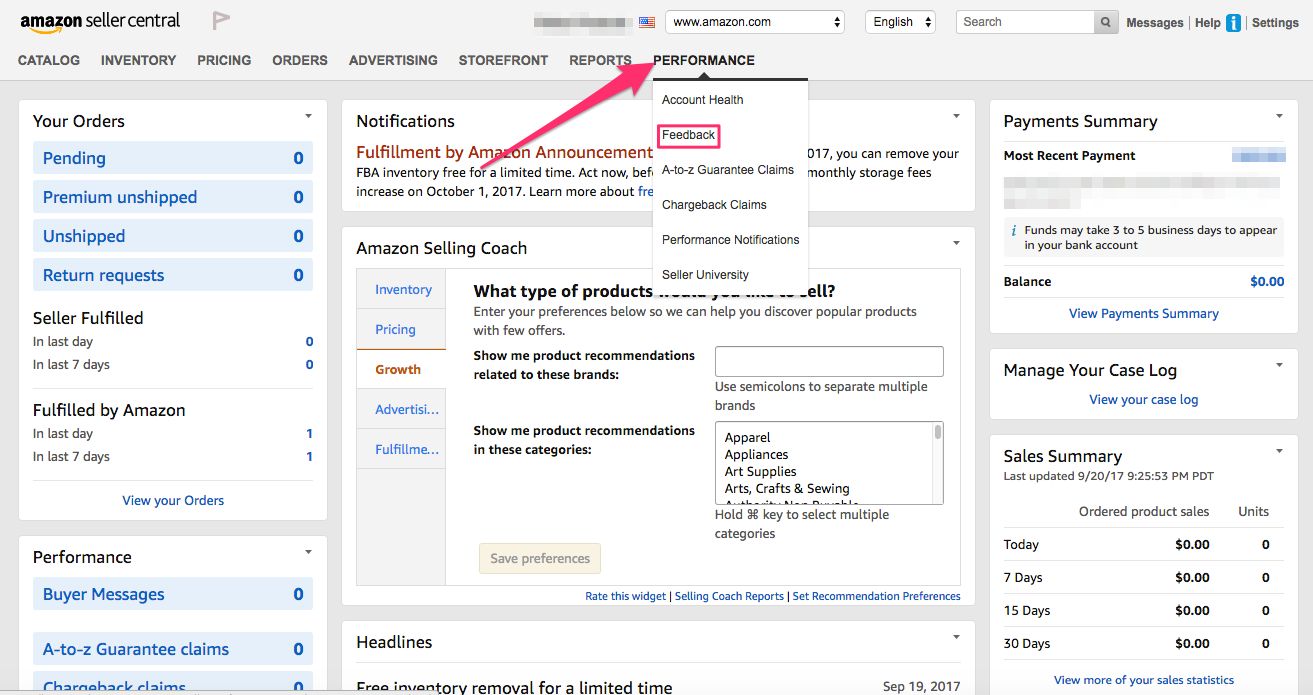
In order to respond to feedback, you first have to know what it is. There are a few different ways you can access this information, the most basic of which is via the Feedback Manager in Seller Central. You can access this tool by selecting Feedback from the Performance drop-down on the Seller Central homepage.
Once inside the Feedback Manager you can view your overall Feedback Rating (based on the five star system), a breakdown of your positive (four and five stars), neutral (three stars), and negative (one and two stars) feedback within the last 30, 90, and 365 days as well as over the lifetime of your account.
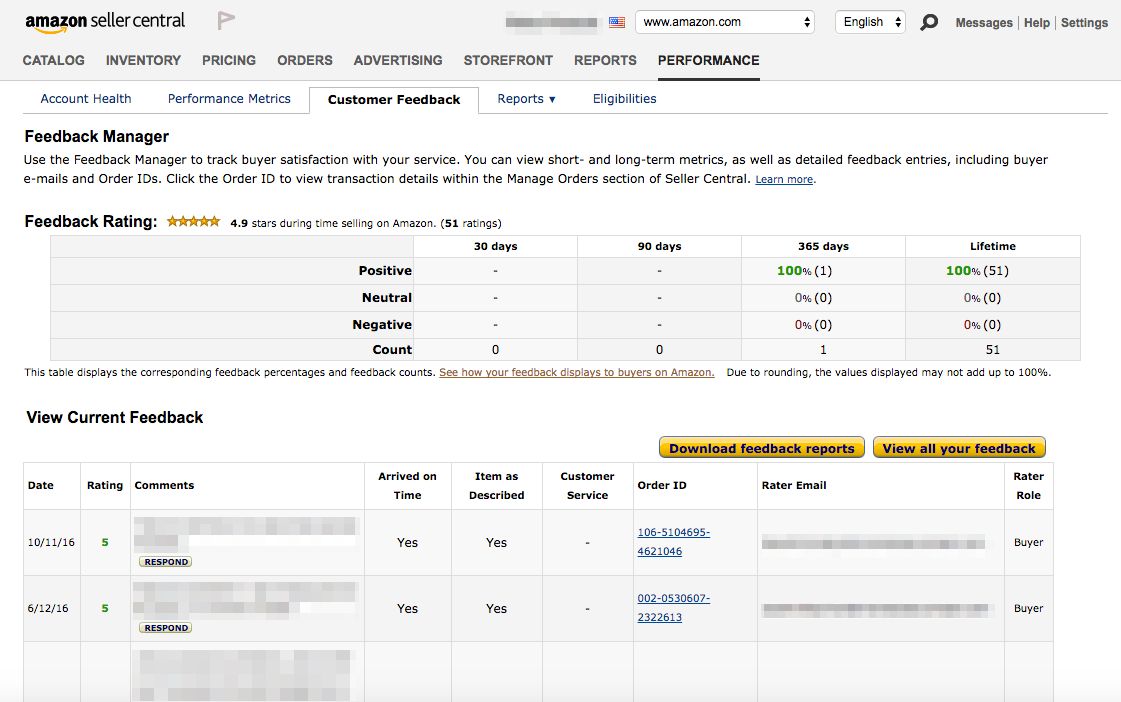
In addition you can download feedback reports to see all neutral and negative or all negative feedback from a specific date range in a single report so that you can follow up accordingly.

Using Salesbacker to Monitor Feedback in Real Time
One of the premium features offered by Salesbacker is email alerts that trigger whenever you receive feedback below a certain threshold that you set (for example three stars or less). The email alert also includes a link to the order detail page, where you can respond directly to the feedback provided. This feature allows you to act instantly to any less than excellent feedback so that you can follow up with the customer to make it right, or work with Amazon to have the feedback removed if it is against Amazon’s feedback policy. Try out this feature by signing up for a free 30-day trial of Salesbacker today. You can also read this guide on how to get negative seller feedback removed.
Learn More At:
Download a report of buyer feedback (Seller Central login required)
About the Feedback Manager (Seller Central login required)
Improve your feedback rating (Seller Central login required)
What can I do about incorrect negative feedback? (Seller Central login required)
7. How to Monitor Performance
Your performance as a seller on Amazon is a crucial factor in the success of your business. Amazon uses performance metrics to determine the level of customer satisfaction from your actions as a seller on Amazon, and if you don’t live up to Amazon’s high quality standards your selling privileges may be removed or revoked. To stay on top of your performance metrics and actively work to maintain the highest performance possible, you need to begin by clearly understanding what metrics Amazon tracks for your performance.
Performance Metrics
There are seven main metrics that Amazon uses to determine the health of your account as it relates to customer satisfaction.
- Order Defect Rate (ODR): This is the key measure of how well you are doing at providing a good customer experience. Amazon presents this metric as a percentage, and calculates it as the number of orders with a defect divided by the total number of orders. Your ODR consists of your A-to-Z Guarantee claim rate, your negative feedback rate, and your service chargeback rate.
- Cancellation Rate: The number of seller-fulfilled orders cancelled by the seller prior to ship confirmation divided by the number of seller-fulfilled orders in a given time frame.
- Late Shipment Rate: The number of seller-fulfilled orders where the ship confirmation is completed after the expected ship date, divided by the total number of seller-fulfilled orders.
- Valid Tracking Rate (VTR): North American sellers are required to provide valid tracking numbers for 95% of your US shipments.
- Return Dissatisfaction Rate (RDR): The percentage of valid return requests that were not answered within 48 hours, or were incorrectly rejected or resulted in negative customer feedback.
- Customer Service Dissatisfaction Rate (CSDR): The percentage of customers not satisfied with your response in Buyer Seller Messaging.
Account Health Dashboard
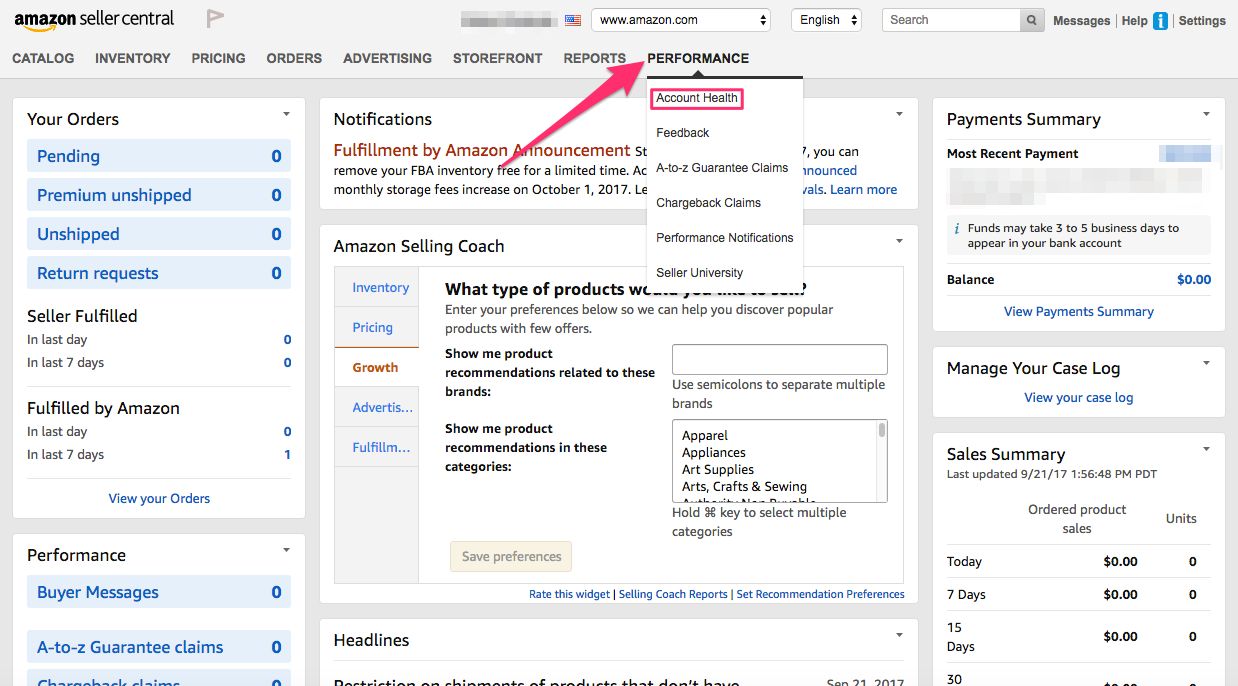
The Account Health Dashboard is the place to go to monitor your performance metrics and identify any areas of improvement. This helpful tool can be accessed by selecting Account Health from the Performance drop-down on the Seller Central homepage.
When you reach the Account Health Dashboard you will see a high level overview of your performance for customer service, product policy compliance, and shipping performance.
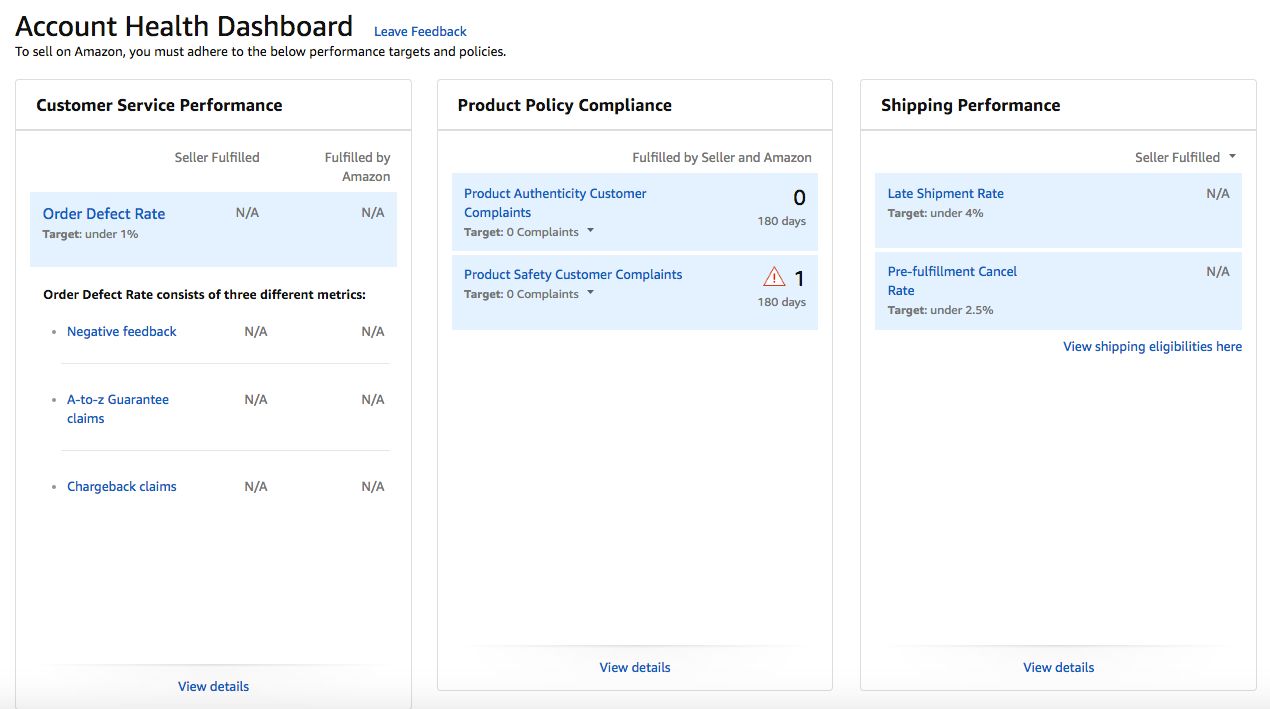
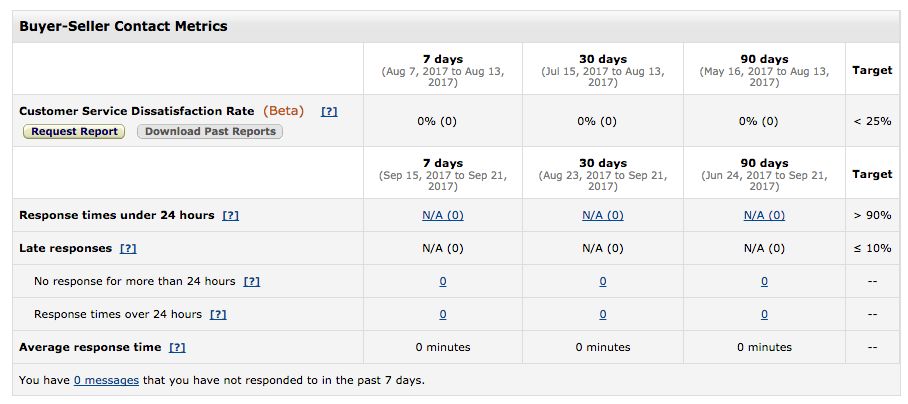
From here you can click on any listed metric, or the View Details link at the bottom of the screen, to drill into more specific and detailed information about the scores you’ve received for each of the performance metrics that Amazon tracks. Here is an example of the metrics tracking for Buyer-Seller Messaging. You’ll notice that the results are listed as well as the targets for each metric.
Learn more at:
Account Health Dashboard (Seller Central login required)
Performance metrics (Seller Central login required
Improve your performance (Seller Central login required)
8. How to Manage Customer Service
As a seller using FBA, you might think that Amazon has customer service covered. While Amazon certainly provides excellent customer service for many issues that customers might face, customers can also reach out to sellers directly with questions, issues, or concerns. When this happens, it is important to be educated on best practices for responding to these types of contacts. It is also important to consider how to be proactive in providing excellent customer service so that you are doing all you can to maintain high quality performance metrics, excellent seller feedback, and top-notch product reviews.
Buyer Seller Messaging
Amazon provides a Buyer-Seller Messaging Service for buyers and sellers to contact each other. For buyers, this is typically for the purpose of asking questions or following up with the seller on any order issues or product quality concerns. For sellers, proactively messaging the buyer at various points in the order fulfillment process can go a long way in creating a good customer experience, and also provides an opportunity to politely request feedback from buyers in the form of seller feedback or a product review.
The Buyer-Seller Messaging Service filters every email from a buyer or seller through Amazon’s system where it is tokenized to protect the contact information of the buyer and seller, as well as acting as an archive of all conversations to ensure that policies are being adhered to, and acting as a resource in the event of a claim or dispute.
Amazon tracks response time metrics for any messages sent to a seller from a buyer, so it is important to respond to all buyer messages within 24 hours or to mark messages as “No Response Needed” in the event you do not need to respond.
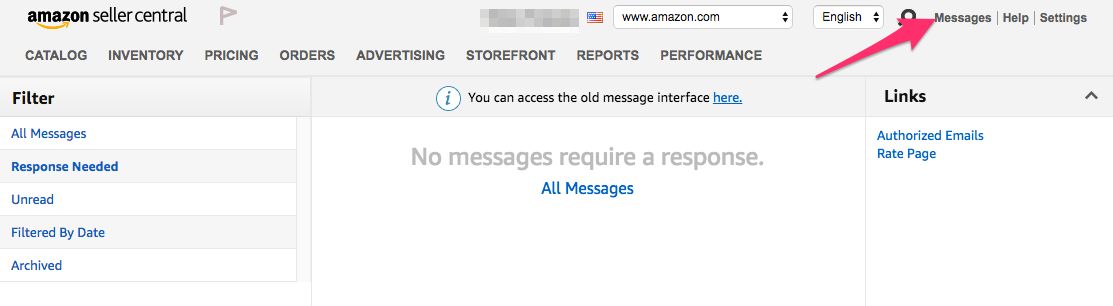
Accessing the Buyer-Seller Messaging Service
You can locate the Buyer-Seller Messaging Service by clicking Messages at the top right corner of your Seller Central screen. You’ll be taken to an interface where you can view all contacts requiring a response, within specific time frames, or you can search for contacts related to a specific order ID or email address.
Learn more at:
https://sellercentral.amazon.com/gp/help/202125900
Using Salesbacker to Contact Sellers and Request Feedback
Salesbacker is a helpful tool that integrates with Amazon’s Buyer-Seller Messaging Service, allowing sellers to automatically email each buyer who purchases a product. Our automatic email campaigns help to grow the number of your product reviews, and allow you to create an excellent customer service experience for your buyers. Sign up for a free 30-day trial of Salesbacker today and see what Salesbacker can do for your business.
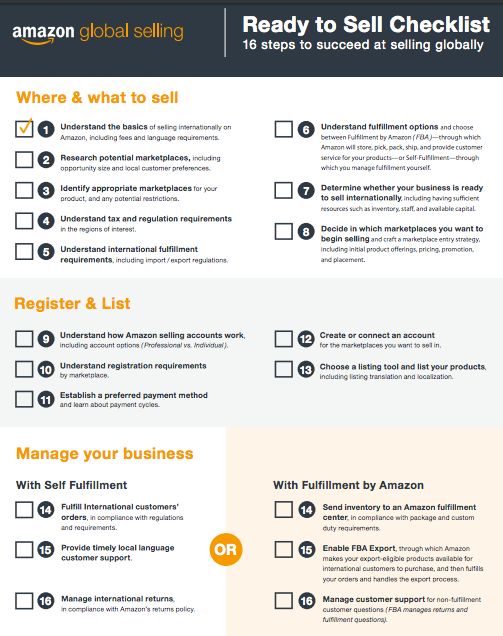
9. How to Sell Globally or in Multiple Marketplaces
One of the perks of selling with Amazon is that you have potential access to customers outside of the US. Amazon has 11 different marketplaces, each with a localized experience that includes the local language and local currency. These marketplaces include:
- Amazon.com (available to sellers in the US, as well as over 100 other countries — site language is English and currency is in USD)
- amazon.ca (Canada)
- amazon.com.mx (Mexico)
- amazon.co.uk (United Kingdom)
- amazon.de (Germany)
- amazon.fr (France)
- amazon.es (Spain)
- amazon.it (Italy)
- amazon.co.jp (Japan)
- amazon.in (only open to sellers with businesses located in India)
- amazon.cn (only open to sellers with businesses located in China)
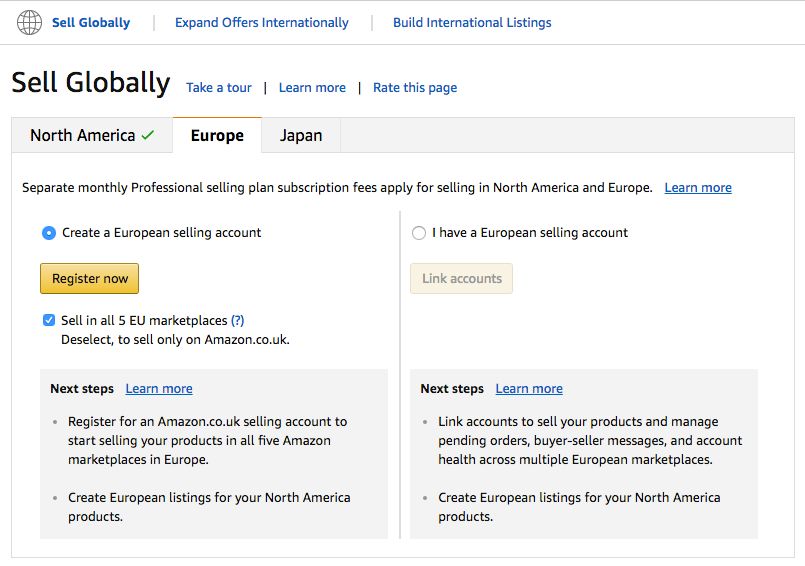
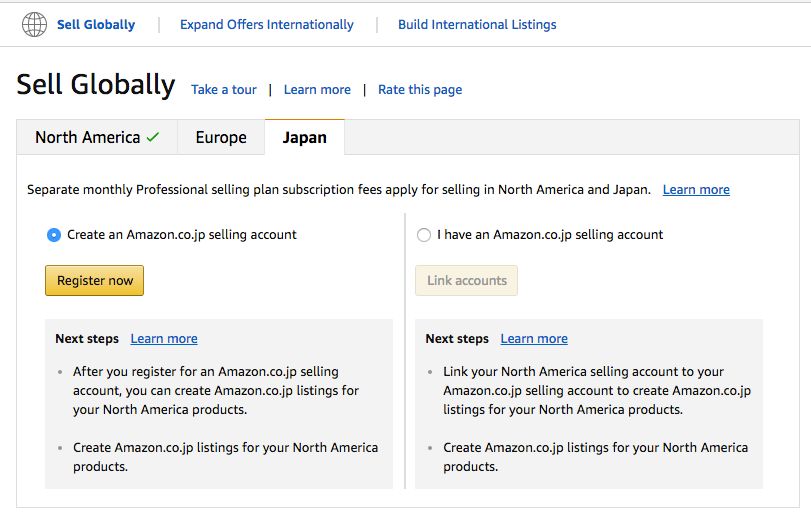
Your North American Seller Central account allows you to sell in multiple North American marketplaces. For example, if you already sell on amazon.com, you can also start selling on amazon.ca and/or amazon.com.mx using your existing North American Seller Central account. It works in a similar manner for European marketplaces — you must first be set up on Seller Central in one European marketplace (amazon.co.uk, amazon.de, amazon.fr, amazon.es, or amazon.it), and you can then expand to other European marketplaces within your existing European Seller Central Account. To sell in Japan, you simply need to have a Seller Central account for amazon.co.jp.
How to Get Set Up
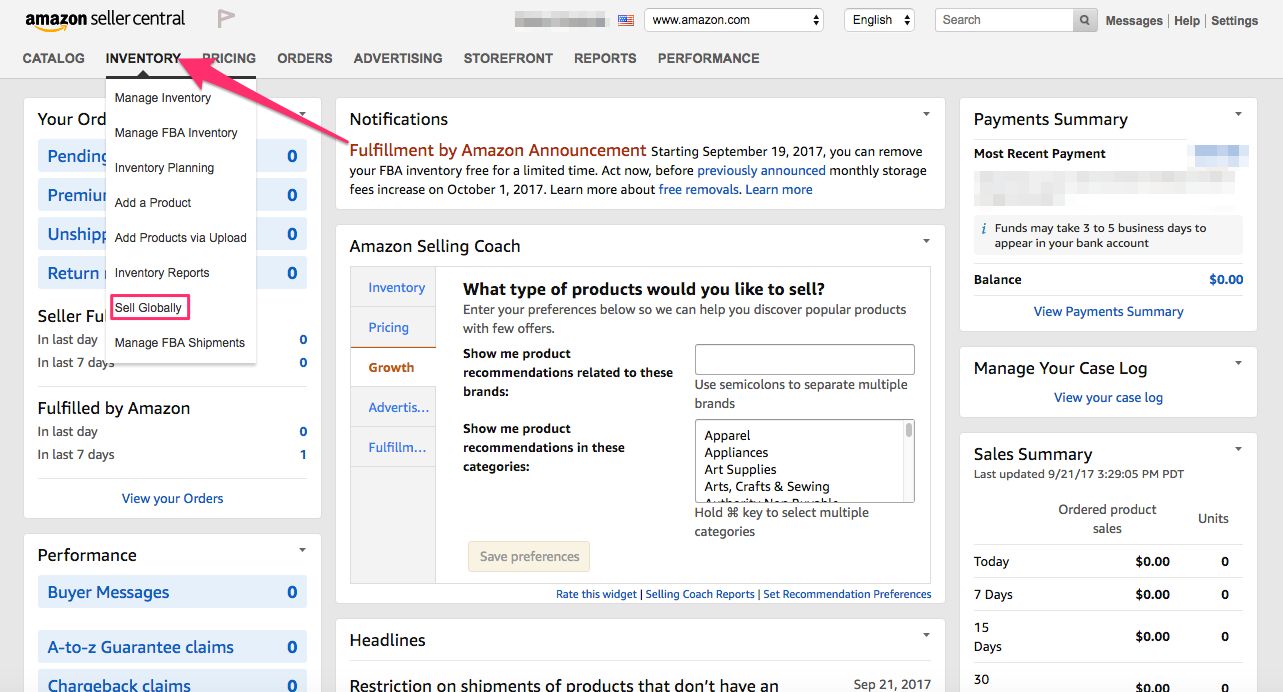
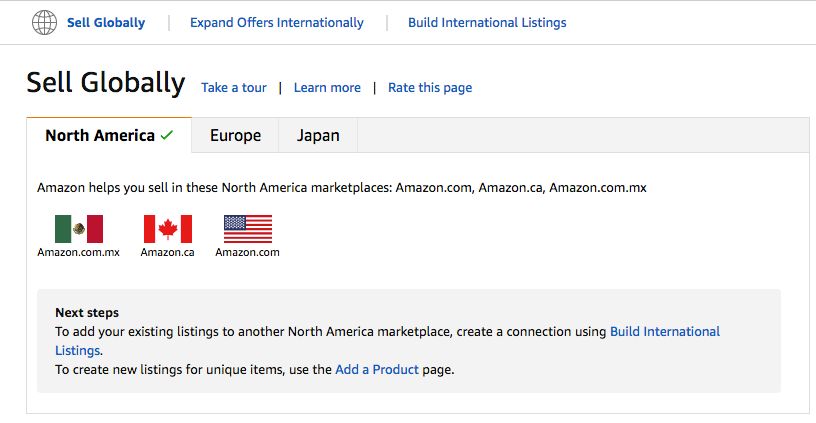
To begin the process of selling internationally, you should select Sell Globally from the Inventory drop-down on the Seller Central homepage.
Next, you will see a tab for North America, Europe, and Japan. Within each of these tabs you will see instructions for getting set up to sell within the marketplaces that are included in that region. From here, you can either make existing products available in amazon.ca or amazon.com.mx by clicking on the Build International Listings link at the top of the screen, or you can add a unique product to a new marketplace by using the Add a Product page.
When you click on the tab for the region you wish to sell in, on the far right side of the screen you will see a guide to selling in that marketplace, filled with helpful information and resources for what you need to know about selling in that country or region. Here’s an example of what this looks like:
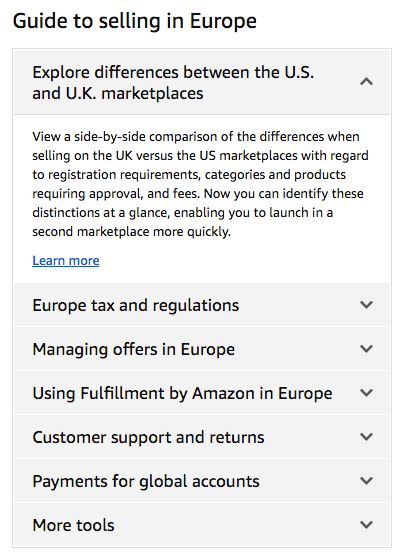
Amazon also provides a checklist for getting set up globally, which is a super helpful resource to refer to as you are walking through the process.
For more details, please see this page in your Seller Central account (requires login)
Using Seller Central as a Tool to Manage Your Business
Seller Central has much to offer in the form of resources and tools for managing your business. Whether you need more efficient ways to manage the day to day tasks, or you’re looking for reports or information to help you make better business decisions, these 10 tips for using Seller Central can put you on the path to a more strategic and savvy way of managing your business with Amazon.
[a]Note to self: I'll include a link to our TaxJar podcast episode once that has been published for additional information on sales tax.